Avatar Tutorial by funnyyulgang
For GIMP

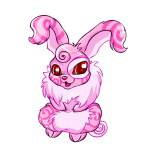
- We'll be working with this image from Marapets so download it to your computer.
- Open the above image in GIMP. Go to Image > Mode > RGB. Right click
on the Background layer in the layers palette and select Edit Layer Attributes.
Rename it to CC Sindi. (You can click on any screenshot to see it full-size).

- Right click again on the newly renamed CC Sindi layer in the layers palette
and select Add Alpha Channel in the drop down menu. Go to the toolbox and choose
the Fuzzy Select Tool. Click anywhere on the white background of the image. Go to
Edit > Cut. Then go Select > None to unselect the image.

- Go to Image > Scale Image and change the size from 150x150 to 75x75.
Then go to Image > Canvas Size and change the size to 50x50. You will get
a preview of what it will resize to. Click Center to center it on the image before
clicking Resize.

- Zoom in to 400% and move the Sindi to the right. Create a new layer and name it
pink bg. Move the new layer to the bottom so it's under the CC Sindi layer.

- Use the Color Picker Tool to select a shade of pink from the Sindi. Select the
pink bg layer and fill it with pink. Switch your foreground and background colors.
Create a new layer and name it white brush.
This is a good time to save your project as a .xcf file. Remember to save and save often!

- Select the Paintbrush Tool. Choose a brush and use it on the white brush layer.
This will break up the background so it's not solid pink. You can optionally set the
opacity down to about 50.0 so the color isn't too harsh.
Create a new layer and name it white bits. Using white (#FFFFFF) and the
Pencil Tool (scaled to 0.50) draw on the left side of the image.

- Using the Color Picker Tool, select a darker shade of pink as your foreground color.
Create a new layer and name it border. Click the white bits layer and then,
using the Fuzzy Selection Tool, click on the part of the image that is not white. Go to
Select > Border and set it to 1px. Return to the border layer and then
go to Edit > Fill with FG Color. Deselect the image again with Select > None.

- Now it's time to add some text. First, change the foreground color to white (#FFFFFF).
Next, click the Text Tool and use a bitmap font (I'm using 04b03, available at dafont.com).
Set the size to 8px and uncheck Antialiasing.
Click on the image and type HAPPY EASTER onto the avatar (put each word on a
separate line). Drag it into the place on the image that you want, in this case on the
bottom left side of the image. Also drag the right side of the text box out to the side
a bit (see screenshot) in case you want to edit the text placement later.

- For this avatar we're going to move the word EASTER to the right a bit so
the text looks less blocky. Right click the text layer and click Text Tool. This will
bring the text box up. Add a few spaces before the word EASTER and it should
move to the right. Close the text box. We need a text border, so right click the text
layer again and click Text to Selection on the drop down menu. Create a new layer
called text border. Move it under the text layer. Go to Select > Grow
and choose 1px. Fill it with the same dark pink as the avatar border.

- Save the image again as the .xcf file. Do not save over this .xcf file after this point or you will lose layer information. Right click on one of the layers and click Flatten Image. You'll be left with one layer bearing the name of the bottom layer at the time of flattening, so feel free to rename the layer to Avatar or whatever you want. Set the foreground color to cyan or any other color you'd prefer. Use the Text Tool to write an H. Drag the H directly over the H in HAPPY EASTER.

- Next, write an A and drag that directly over the A in HAPPY EASTER. Keep repeating this process with each letter until all the letters are covered by cyan ones. Once done, change the foreground color to white and begin covering each letter again until all the cyan letters are white again.

- After all the letters appear to be white once more, go to Filters > Animation > Optimize (For GIF). This will open a new file with all the layers from the other file in it. Exit the old file without saving (the new file will be saved).
- Click Filters > Animation > Playback to view your avatar as a finished product. If that's satisfactory, it's time to save. It needs to be saved as a .gif file. While saving as a .gif, make sure to choose the Save as Animation option. Be sure the Loop Forever option on the following prompt is checked.
You're done!
- A Photoshop version of this tutorial can be found here.
- Please do not duplicate any part of this tutorial without the permission of funnyyulgang.
|